
Why does a once-powerful spray start wandering off in thin, uneven jets? Could a simple kitchen staple dissolve the crust that is choking the nozzles, without harming the finish underneath?
Why Does Mineral Buildup Strangle the Spray Pattern?
The short answer is that hard water leaves a deposit behind every time it dries. Water in hard water areas carries dissolved minerals, chiefly calcium, and when that water sits in and around a shower head, some of it stays behind as a hard, chalky crust. That crust is limescale, the same substance that furs up kettles and clouds shower screens, and a shower head gives it dozens of tiny doorways to block.
Each nozzle in the face of the head is a small opening, and the spray pattern depends on all of them flowing freely. Scale builds at those openings first, narrowing some, sealing others completely, and deflecting the rest. The result is the familiar pattern of failure, with one jet shooting sideways, another reduced to a dribble, and the whole spray feeling weaker even though the water pressure in the pipes has not changed at all. What feels like failing pressure is usually just a blocked exit.
Vinegar answers the problem because of simple chemistry. White distilled vinegar is mildly acidic, holding about five out of every hundred as acetic acid, and acid dissolves limescale, which is mainly calcium carbonate. Set the crust soaking in vinegar and the deposit slowly softens, loosens and washes away, reopening the nozzles without any force. Anyone who has dealt with the best way to clean tile grout in the same bathroom will recognise the pattern, since vinegar based cleaning rewards the same slow, prepared approach throughout the room. The fuller chemistry sits behind the science of limescale and hard water deposits, which explains why the crust forms in some homes and barely appears in others. No scrubbing strength is required, only patience while the acid does the work.
Which Supplies Does the Soaking Method Call For?
The shopping list is mercifully short, and most homes already hold everything needed. The essential item is white distilled vinegar, chosen deliberately. Malt vinegar and brown vinegar are the wrong tools here, since their colouring can stain pale grout and seals, and their composition is meant for the table rather than the bathroom. A plain bottle of white distilled vinegar is inexpensive, widely sold for cleaning as well as cooking, and strong enough for the job.
Alongside the vinegar, gather the following simple supplies before you begin, so the work runs without interruption.
- A bowl or jug large enough to hold the shower head, for the soaking method
- A sturdy food storage bag and a strong elastic band, for the bag method on fixed fittings
- An old soft toothbrush for loosening softened deposits
- A pin or a wooden cocktail stick for stubborn individual nozzles
- A soft cloth for wiping and drying the finish
- Plumber tape, if your head screws off a threaded fitting and will need resealing
- A spare jug of clean water for rinsing parts as you work
Two habits before you start save trouble later. Work when the shower will not be needed for several hours, because soaking cannot be rushed, and lay a towel in the bath or shower tray beneath your work area. The towel cushions any part you drop, catches drips of vinegar before they sit on seals or stone, and keeps small screws and washers from vanishing down the plughole.
How Does the Bag Method Work on a Fixed Fitting?
Many shower heads cannot be removed at all. Fixed fittings rise from the wall or hang from a rigid arm, and forcing them risks damaging pipework hidden behind tiles. The bag method exists for exactly that situation, bringing the soak to the head instead of taking the head to the soak.
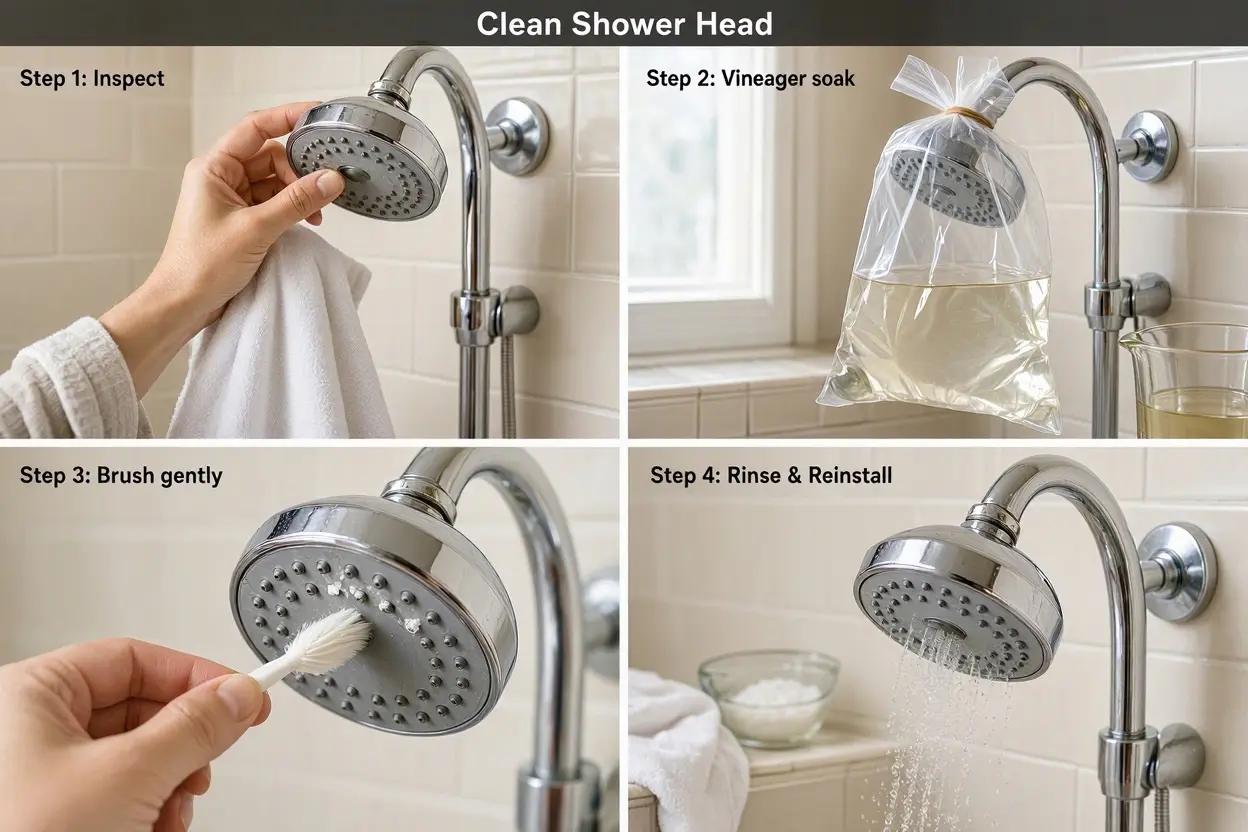
The method runs as follows. Half fill a sturdy food storage bag with white distilled vinegar, using enough to cover the face of the head once the bag is raised into place. Lift the bag up and over the shower head so that the whole face sits submerged in the liquid, with every nozzle under the surface. Secure the bag firmly around the neck of the fitting with a strong elastic band, checking that it holds the weight without slipping. Then leave it undisturbed for the soaking time your level of buildup requires, as set out further below.
A few refinements protect both the fitting and your patience. Test the filled bag weight before you commit, since a large bag of vinegar is heavier than it looks, and a band that slips at midnight leaves a vinegar soaked bathroom floor. If the head sits on a flexible hose as a handheld unit, the bowl method below is easier and safer. When the soak finishes, ease the bag down into a sink rather than tipping it over the bath, run the shower briefly to flush loosened deposits through, and wipe the face clean. The nozzles should spray evenly again, and any stragglers can be dealt with by the brush and pin steps described later.
When Should a Removable Head Be Taken Down and Submerged?
A removable or handheld head allows the more thorough treatment, because the whole unit can sit fully submerged and its hidden parts can be cleaned as well. Unscrew the head from its hose or arm by hand where possible, turning gently and supporting its weight. If it resists, a cloth wrapped around the fitting protects the finish while you apply careful pressure, and stubbornness is a signal to pause rather than force anything.
Lower the head into a bowl of white distilled vinegar so the face and body sit covered, and leave it for the time matched to your buildup and finish. While it soaks, turn your attention to a part many cleaners miss entirely, which is the filter screen. Inside the neck of most heads sits a small mesh screen that traps grit from the water supply. Rinse that screen under a running tap, brushing away any trapped particles, because a clogged screen strangles flow just as surely as scaled nozzles, and no amount of vinegar on the face will cure it.
Reassembly deserves the same care as removal. Rinse the head thoroughly in clean water, shake out the loose liquid, and check the washer sits soundly in place. If the fitting threads were wrapped with plumber tape originally and that tape looks ragged, wind on a fresh neat layer before screwing the head home, tightening by hand until snug. Run the shower briefly for a minute or two. That first flush pushes out loosened scale and vinegar alike, and lets you judge the restored spray pattern with the head back where it belongs.
Which Finishes Demand a Shorter, Weaker Soak?
Vinegar is gentle by the standards of cleaning chemicals, but acid is still acid, and not every finish tolerates a long bath in it. Matching the soak to the surface is the difference between a restored shower and a damaged one. The guidance below reflects common manufacturer style advice, which varies by brand, so checking the instructions supplied with your own fitting always comes first.
Sturdy finishes forgive the most. Chrome and stainless steel generally tolerate longer soaks well, and a head with heavy buildup in those finishes can sit for several hours, or even overnight in stubborn cases, without harm. Light buildup on any finish needs far less, often well under an hour, because the acid only has a thin crust to dissolve. Judging by buildup first and finish second gives the safest combination.
Delicate finishes demand restraint. Brass, brushed nickel, oil rubbed bronze and gold finishes can all be marked or dulled by prolonged contact with undiluted vinegar. For those surfaces, shorten the soak considerably and dilute the vinegar with an equal measure of water, checking the surface regularly as the minutes pass. Lift the head out the moment the deposits have softened enough to brush away, rather than leaving it to sit out of habit. The background reading in the chemistry and household uses of vinegar reinforces the point, since the same mild acidity that dissolves scale can slowly work on sensitive metals and coatings too.
Why Does Mixing Household Cleaners Create a Serious Hazard?
One safety rule stands above every tip in these pages, and it admits no exceptions. Never mix vinegar with bleach. The combination releases chlorine gas, a genuinely dangerous substance that can injure lungs and eyes in the enclosed air of a bathroom. If bleach has been used in the shower earlier in the day, rinse the area thoroughly and let time pass before vinegar goes anywhere near it, and never add vinegar to a bucket or bottle that already holds bleach based cleaner.
A second popular mixture fails for the opposite reason. Combining vinegar with baking soda looks dramatic, fizzing energetically in the bowl, yet the two substances neutralise each other. The acid and the alkali cancel out, leaving a liquid far weaker than the vinegar you started with. For descaling, that theatre actively harms the result, so keep the soda for other jobs and let the vinegar work alone and undiluted, unless a delicate finish calls for water.
Honesty about limits belongs in this section too. Vinegar can reduce some germs on a surface, but it is not a registered disinfectant, and a soak should never be presented as sterilising a shower head. Shower heads can harbour biofilm inside, where bacteria shelter beyond the reach of a surface clean. Anyone returning to a shower unused for a long stretch should run it hot and flush it through before use, and anyone concerned about waterborne illness should follow health guidance rather than relying on vinegar for reassurance it cannot honestly give.
How Often Does Hard Water Call for Another Clean?
Frequency depends on your water, your usage and your tolerance for a wandering spray. In a hard water home with daily showers, scale rebuilds steadily, and a clean every few months keeps the spray pattern honest. In softer water areas, the same job may only be needed once or twice a year. The spray itself is the best calendar. The moment jets start straying or the flow feels thinner at the edges, the nozzles are asking for attention.
Prevention stretches the gaps between cleans. Wiping the face of the head dry after the last shower of the day leaves less standing water to deposit its minerals. Flexible silicone nozzles found on many modern heads offer a lazier mercy still, since a firm rub of the thumb across them cracks forming scale loose before it hardens, and many heads only need that rub plus a brush over the face after soaking to clear fully. A pin, used gently and only on stubborn holes, finishes the few nozzles that resist both acid and brushing.
Flushing deserves a place in that routine as well. A shower left unused while a household is away allows water to sit still inside the head and pipework, and running the shower through thoroughly on your return, before anyone steps under it, clears that standing water out of the system. The same habit after cleaning pushes loose fragments of scale out through the nozzles rather than leaving them to settle and harden again. Small, regular attention of that kind is what separates a head that needs rescuing once a year from one that simply keeps working.
If pressure stays poor after a thorough clean, look beyond the head.
Check the filter screen again, inspect the hose for kinks or internal collapse, and consider whether the whole home suffers low pressure that no cleaning can cure. A newly cleaned head on a weak supply still sprays weakly, and recognising that boundary saves you from soaking a healthy fitting again and again in search of a fault that lives elsewhere in the system.